Premiere 

5 FOUNDATION SKILLS
JOSH: THESE ARE THE FILMS THAT WILL BE AVAILABLE TO EDIT ON ALL THE COMPUTERS:
SKATEBOARD SENSE
BUS NUT
PERSONAL HYGIENE
HARLEM RENAISSANCE
TOWARD EMOTIONAL MATURITY
AS OTHERS SEE US

1.  Timeline +  Tools


trimming with red bracket 

Josh and Hattie: just show where these are...demonstrate selection, track select, zoom, and hand tool (you'll go over ripple, rolling, rate stretch, slip, and slide in the ADVANCED skill set. )

selection
track select
zoom
hand
Button Keyboard
Shortcut
Description
Selection V Selection tool
The default tool, used to select clips in the timeline.
Track Select M Track Select tool
Select all clips on a track from a given point, or select multiple tracks.
Ripple Edit B Ripple Edit tool
Adjust an edit point and move other clips in the timeline to compensate.
Rolling Edit N Rolling Edit tool
Adjust an edit point between two clips without affecting the rest of the timeline.
Rate Stretch X Rate Stretch tool
Change the duration of a clip while simultaneously changing the speed to compensate.
Razor C Razor tool
Cut a clip (or multiple clips) into two clips.
Slip Y Slip tool
Move a clip's in and out points by the same amount simultaneously, so the rest of the timeline is not affected.
Slide U Slide tool
Move a clip back and forth in the timeline, while simultaneously adjusting adjacent clips to compensate.
Pen P Pen tool
Create control (anchor) points.
Hand H Hand tool
Drag the timeline view left and right.
Zoom Z Zoom tool
Click in the timeline to magnify the view, or drag and select a rectangular area to zoom into.


2. Navigating clips:  In points, Out points, Sub Clips, Moving Clips in the timeline
Import multiple clips, select in points and out points, bring the clips into the timeline.
Create subclips:  Control/(grab the screen with hand tool, drag into bin window)
Import a group of subclips into the timeline. 


3. Layers
Josh: this is a PNG file...so it's a good way to show layering: plus, our camp motif this year is the bee...we'll use the bee in every tutorial (we'll have the bee printed on all the t-shirts)


4. Keyframing Video, Audio and Pics 


5. Transitions and Effects


SHORT PROJECT

Use about 30 seconds of the Skateboard Sense music  
(the opening music lasts about a minute).
Pick images from the other films we've provided and edit a sequence that makes sense.
Use effects: transitions, 3D effects (just to get them out of your system!).
Get acquainted with the software.  


5 ADVANCED SKILLS


1. Trimming and stretching:  rolling, rippling, slip, slide, rate stretch tool


Exanding time

 Real Time

Compressing Time


2. Effects Controls (Position, Scale, Rotation, etc)


3. Editing a film sequence with cutting on action


4. Nest a photoshop sequence in your Adobe Premiere Pro Project

ADD THIS PSD FILE (Josh and Hattie; THIS IS ONLY A JPG BUT WE WILL HAVE ALL THE LAYERED PSD FILES ON THE COMPUTERS)


5. Add a flash movie....with layers....or AE file (Depending on where the group is at)


ADVANCED PROJECT


Take your Short Editing Project and build on it.  

This time edit to a full minute of skateboard music. 

And or/bring in audio from the sound tracks in the films provided. 

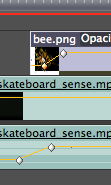
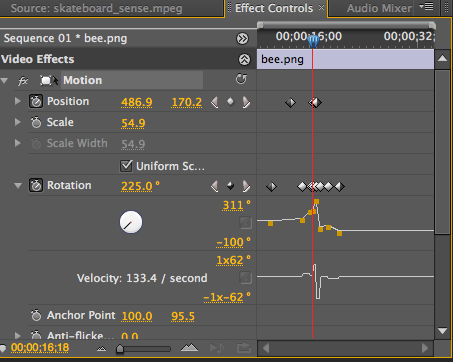
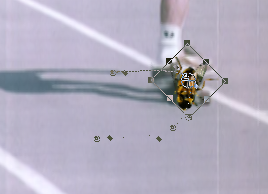
Create some animation (using the bee or the fish, if you want).  

Work on using the trimming tools (these take practice).  


EDITING DON’TS


  1. Jump cuts: Unless you have a specific reason for doing so, don’t show a shot that’s the same size in a row, unless you have some artistic reason to do so. VARY YOUR SHOTS: Establishing shot, CU, MS, CU, LS
  2. Repeated shots: No No!: never show the same shot twice—a different PART of the EST. shot is okay, but not the exact same part you used before. People have a visual memory, especially with CUs.
  3. Avoid overcutting
  4. Avoid cheesy wipes and effects, unless absolutely necessary (wipes and effects are the mark of an amateur—in love with the technology and insecure about editing.)


EDITING DO’s

  1. Action Continuity: make sure people are moving in the same direction from one shot to the next.
  2. Light Continuity: make sure you don’t cut from a dark shot to a light shot in the same scene.
  3. Sound Continuity (sometimes the hardest component): Make sure you maintain consistent sound: you may need to borrow natural sound from a completely different part of the tape to cover up a sound problem…Audio plays a very very important role in influencing the mood and pace.
  4. Cuts should be invisible. Cut DURING the action (for example, from MS to CU), matching action between shots.
  5. Make room for “breathing” room: sit on a LS—that’s okay sometimes. Sometimes editing rhythm is dictated by the type and number of audio soundbites: Are there lots of intense soundbites in a row? Provide space between soundbites: Think about how much space.  When do you let video take over? A properly edited program should appear not to have been edited at all.
  6. Push the beat:  to create a bit of adrenaline, place your visual transitions a few frames BEFORE the musical beat. We see something before we hear, something so pushing the visual BEFORE the music gives the appearance that you’re landing on the beat.
  7. Make sure you VARY the size of your shots:  LS—MS—CU.  Also, don’t underestimate the power of CUs:  Remember this: TV is a Closeup medium.  All your pieces should have good STRONG, “JUICY,” CUs.


How to Export the Video:

 Once you’re done, once your piece is PERFECT, then go to File/Export/Movie.  Name your movie after YOUR NAME (this helps me a lot).  Save it to your desktop.