Movie clips
Movie
clips
The first time someone builds a complex Flash
project, the Timeline stretches out forever and becomes very difficult to work
with. At some point in the
authoring process, the designer may discover Scenes and try using those to manage
the huge, unwieldy sequence of frames.
However, scenes don’t make the Timeline more compact; they only break it
up, the way a book is broken up into chapters. What works much better is to use movie clips for any motion
or action that must be repeated or that must remain available to the user.
Movie clips are a type of symbol in Flash (the
three types are graphic, button, and movie clip). They act like mini-movies inside the main movie, so they can
play parallel to (or simultaneously with) other parts of the movie. With movie clips, a Flash movie that
had 100 or more frames could be pared down to as little as one frame!
Some people wrongly think that Graphic symbols are only for
when the symbol contains a single frame and Movie Clip symbols are only for
when you have multiple frames. The differences go much deeper than that. The
best approach is to always use Movie Clips unless you have a reason to use
Graphic symbols. The first thing
to learn is that both Movie Clips and Graphic symbols can contain one or more
frames. However, only Movie Clips will automatically loop regardless of where
you place instances of that clip.
Movie clips offer incredible versatility to a
Flash designer, and yet it takes some practice before working with them begins
to feel comfortable. After you
figure out how useful they are, you will begin to realize that almost every
cool thing you’ve ever seen in a Flash movie was done with movie clips. They really are worth the effort.
Demonstrate:
Start with a new Flash document and change your
frame rate to 15 fps.
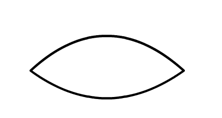
- Make an eye shape on the Stage (just the outline of an
eye). The easiest way to do
this is to draw a LINE with the Line
tool and then use the Selection tool to bend it upwards. Then draw another line and bend it
downwards.
- Select the ENTIRE SHAPE by dragging a box around it
with the Selection tool. Then
group the shape (Modify/Group, or Apple “G”). This prevents it being broken up inadvertently.
- With the shape still selected (make sure you see the
blue bounding box), Convert to Symbol (press F8). In the dialog box choose Movie Clip and give the symbols a
sensible name, such as eye.
- Double click the symbol to enter Symbol Editing Mode.
When you are in Symbol
Editing Mode, you’ll see a blue arrow on the left, just below the
layers list in the Timeline.
NOTE: make certain
that your mouse cursor is on the outline when you double-click the eye
shape. The cursor must be on
a stroke or fill color within the symbol. If the cursor is on empty space (even if it is inside
your outline), you will not enter Symbol
Editing Mode. If your eye
outline has no fill color, it can be very tricky to select it by
double-clicking, so be sure you get it right. If it’s just too difficult, open the Library panel (press F11), find the movie clip, and
double-click it in the list there.
That will put you into Symbol
Editing Mode!
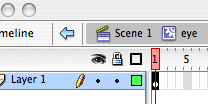
To
the right of the blue arrow you’ll see Scene 1, and to the right of that,
you’ll see the name you gave your movie clip.
When
you’re in Symbol Editing Mode,
you’re working in an independent Timeline that operates separately from the
main Timeline of the Flash movie.
To return to the regular editing environment, click the blue
arrow. To enter Symbol Editing Mode for a movie clip
(or a button), double click the object.
You can double-click iteither on the Stage or in the Library.
- In Symbol
Editing Mode, you have one layer in this movie clip’s Timeline, and
it’s holding the eye shape you made.
Rename that layer eye
outline.
- Make a NEW LAYER and name it eyeball.

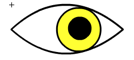
- Click Frame 1 in the new “eyeball” layer and draw an
eyeball on the Stage. It’s quite important that you’re
in a different layer, b/c the eyeball is going to move while the eye
outline (below it) stays in place.

- Select the entire eyeball shape and Convert to Symbol (press F8). In the dialog box, choose Graphic, and give the symbol a name, such as “eyeball.” You must make it a symbol, b/c
you’re going to use a motion tween on it. (The eye outline will not move, so it’s okay just to
group it on its layer as you have done.)
- Select and drag the eyeball to a position inside the
eye outline on the left side in the outline. (of course the eyeball and the outline are still on
separate layers, but it should look as if the eyeball is inside the
outline).
- Click in Frame 2 of the eyeball layer on the Timeline and add a new keyframe (F6).
- Click in Frame 3 of the eyeball layer on the Timeline
and add a new keyframe there too (F6). You now have 3 keyframes with the
eyeball in the same position.
- Click in Frame 2 of the eyeball layer, and then move
the eyeball on the Stage to the right side of the eye outline (still
inside the outline).


Frame 1 Frame
2 Frame
3
- Click in Frame 1 of the eye outline layer and add two
regular frames (press F5 twice). This extends the Timeline on the lower layer and
makes the outline of the eye visible under all the frames in the upper
layer.
- File menu/ Save
- Click
Frame 1 in the eyeball layer and add five frames (press F5 five times).
- Click the
next keyframe (it should be Frame 7 now) and add five frames there too
(press F5 five times).
- Click any frame in the first gray block of frames on
the “eyeball” layer and apply a motion tween.
- Click any frame in the second gray block of frames on
the eyeball layer and apply a motion tween there too.
- Now the eyeball is moving left to right and right to
left, but the eye outline layer must be extended again (it is still only
three frames long). To do
that easily, click in the eye outline” layer under the LAST KEYFRAME in
the eyeball” layer (that should be Frame 13) and press F5 once. Frames are automatically added to fill out the layer
from Frame 1 up to the frame position you clicked. This is a very useful technique to
know!
- Exit from Symbol
Editing Mode by clicking the blue arrow.
- Save and test your movie. What should happen: the single eye is looking endlessly
left, right, left, ritght.
- Just for fun (and really, to demonstrate how movie
clips actually work), open the Library (press F11) and frag several instances of your eye movie clip onto the Stage. You have only one layer and one
frame on your main movie Timeline, but that’s okay. Put all the eye instances there
together. The more the
merrier.
- Save and test your movie. (Control Enter)
- One last trick:
Back on the Stage,
select one of the instances of the eye movie clip and flip it. Here’s how: With the object selected, choose Modify /Transform/Flip
Horizontal.
- Save/test your movie (control Enter).
Now you should understand one of the important
ways in which a movie clip can be used.
Whenever a Flash designer needs a repeated motion in a movie, the best
way to meet that need is to take the repeated motion off the movie Timeline and
put it inside a movie clip instead.
Imagine you have a map showing the locations of
key events at a crime scene. Each
location is marked by a dot that pulses bright and dark, bright and dark. What is that dot? It’s a movie clip. Every dot on the map is an instance of
the same movie clip (and one that’s pretty simple to make). Maybe you think that dot should be a
button, so the user can click it and read about the crime scene, one location
at a time. Okay. Make a movie clip
of a dot that pulses, and then put that movie clip into the UP frame inside a
button symbol. Or, alternatively,
build the movie clip inside the UP frame.
DEMONSTRATE
(see example, button-movieclip).
Homework
1.
Insert a movie clip into a button, as demonstrated in class
First, develop a button (make it large enough)
Then add another layer for your “movie”
Develop a movie clip that moves on top of the button like a
flashing blob. Save it.
Delete the movie layer
Transfer the movie clip to the UP part of your button.
2.
Use a Movie Clip to Make a Rotating Wheel
In this task, you’ll nest a clip of a wheel inside a clip
that will become an animating wheel that you can use anywhere you want.
1. Draw a
circle with a few lines crossing it.
Don’t make it perfectly symmetrical – that way you’ll be able to see
it rotate. Select the entire shape
and then select Modify, Convert to
Symbol (F8). Name the symbol Wheel, choose the
default Movie Clip behavior type,
then click OK. You are going to
make a movie clip of the wheel spinning next, but you need an instance of the
plain wheel first.

Some
quick advice about Instances:
The Properties panel provides a place to name a movie clip
instance. What's the point of
naming an instance if the symbol already has a name in the Library? It provides
a way to give each instance on the Stage a unique name. Only then can you
address individual movie clips. Think about how you address a person. You first
say his name, and then you tell him what you want. If you want him to stop, you
say, "Joe, stop." This is the concept of addressing, which is key to
getting ActionScript to work.
A movie clip will keep animating even when you stopped the Timeline. Stopping the Timeline is like yelling "Stop!" into
a crowd. Simply saying "stop" isn't enough. You have to say,
"Hey, Movie Clip 1, you stop." But you can't talk to an individual
instance unless that instance has a name. As you'll soon see, you can do much
more than tell movie clips to stop.
By
The Way: Instance Names Versus
Symbol Names:
Don’t confuse the master name for a symbol in the Library with the instance name for just
one instance on the Stage. Every item in the Library must have a unique name, but symbols in the Library exist just once. You can drag as many instances of a
symbol as you need to use throughout a movie. Any instance set to Movie
Clip can be given its own instance name, regardless of the properties of
the mast in the Library. If the instance name is unique (that
is, different from any other instances), you can address it directly. I know I thought at first that because
the mast in the Library has a name,
the instance does, too. The truth
is that an instance has no default name.
Now continue…
2. Select the
onscreen instance of the Wheel symbol and convert it to a symbol (F8), name it ROTATING WHEEL, make sure you leave Movie Clip set as the behavior and
click OK. I know you already had a
symbol, but consider what converting to a symbol does: It takes what’s selected and puts it
into the Library. In step 1 you
put a shape in the Library. In
this step you too an instance of Wheel and put it in the Rotating Wheel
symbol.
3. Go inside
the master version of Rotating Wheel by double-clicking the instance
onscreen. In the edit bar you
should see Scene 1: Rotating
Wheel. If you now single-click to
select the instance (inside the Rotating Wheel) you should see “Instance of:
Wheel” in the properties panel.
This means that Rotating Wheel contains an instance of Wheel.
4. While
inside Rotating Wheel, we’ll do a simple motion tween of the Wheel
instance. To do this, click Frame
20 and insert a keyframe (F6).
Select the first keyframe and from the Properties panel select Tween
Motion, Rotate CW 1 Time.
5. Go back up
to the scene. You should see an
instance of Rotating Wheel, although now it has a 20-frame rotation you can’t
see. Use Test Movie to ensure that
it does.
6. Create
another instance of Rotating Wheel by either copying and pasting the instance
onscreen or by dragging another instance from the Library. Position the two Rotating Wheel
instances side-by-side and then use the Brush tool to draw the car body. Select everything and convert it to a
symbol called Car (leave it with the Movie Clip behavior)
7. Insert a
keyframe at Frame 30 (in the main Timeline) and then with Frame 1 selected, set
the Properties panel to Tween Using Motion. Movie the instance of the Car in either Frame 1 or Frame 30,
and you should be able to see the car move when you scrub (just like any other
motion tween. To see the wheels
rotate test the movie. Scrubbing
only previews the animation across the Timeline in the current movie clip, not
any nested movie clips.

- Interactive Slideshows.
Download Soundslides.com, a flash-based slideshow
generator. (You’ll just donwload the demo copy….skip registration—click
“later.” The program is pretty
self-explanatory: upload 8-10
jpgs. Upload some music in an mp3 soundfile. A tutorial, if you need it, is here. See if you can generate an interactive
slideshow.