HOW TO USE THE PEN TOOL
The Pen tool looks like this: 
1. Use the Pen tool to create a PATH.
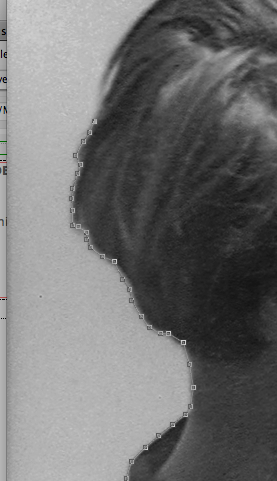
2. Drag the pen and create a Bezier curve. Option "Click" to you release it and continue with the pen tool.
3. When you're done pen-tooling all the way around...CLOSE THE PATH: see the little circle next to the Pen as you return to the first pen tool anchor point? That means you're ready to close the path. When you close the path it will turn into a grey line (NOTE: depending on your PS settings, sometimes there will be no grey line!)
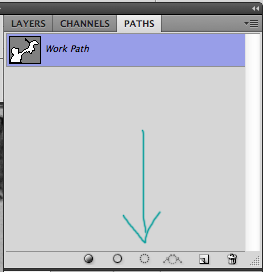
4. Go to Window/Paths...do you see the Work Path? Convert the path to a Selection...Make sure your Work Path is highlighted.
And select the third button over: the one that looks like a circle of "dots." This will convert your path to a Selection.

5. You can Inverse your selection as needed (Select/Inverse) or save your Selection and load it another time.
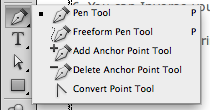
6. You can also experiment with the tools associated with the Pen tool.
The Freeform Pen Tool allows you to draw around the shape and then immediately create a WorkPath, that you can then convert to a Selection; the Add Anchor Point and Delete Anchor Point are self explanatory.
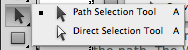
The ARROW (under the Text tool) has two settings, the Black Arrow is the "Path Selection Tool" used to grab and restyle the Work Path. The White Arrow is the "Direct Selection Tool," used to alter the location of specific anchor points.
|